Sunday, 27 May 2012

Vanilla cupcakes with strawberry flavoured frosting!

Whenever I look at cupcakes in stores or online, I just feel so envious of how beautiful they look.
I can never actually manage to get them looking pretty enough. Maybe its because of my complete lack of talent when it comes to decorating cakes. I usually just messily ice my cakes- because obviously taste matters much more- but more importantly- because I'm terrible at making any cakes look pretty and presentable!

Oh well, recently it was my friends' daughters' first birthday and I set a goal for myself to make cupcakes that I was actually going to be pleased with- with a pink theme :-), because pink is just awesome. and girly. and means I could incorporate something strawberry-ish to them!!

Anyway, I got myself a little cake frosting kit, cute pink cupcake cases and lots of pink sprinkles!!!...And then I started baking.

After deciding on soft, fluffy, vanilla cupcakes with a strawberry flavoured frosting I got started.

Cupcakes are actually fun to bake :-) and they don't really take that long either.

They are prettier and little kids love to eat them.
So do big kids :-)

The result? Awesomely soft, fluffy, light as air vanilla cupcakes with a thick layer of strawberry flavoured frosting. Even I liked it- and I must admit I'm not really a 'non-chocolate cake' fan.

I kept some cupcakes for home and they didn't last long AT ALL!!!
A very nice feeling :-)


Light and fluffy :-)


Ingredients for the cake batter:
4 eggs
8oz self- raising flour
8oz caster sugar
8oz margarine
Vanilla essence

Mehod:
Preheat the oven at Gas mark 4
Beat the sugar and the margarine with a hand-held mixer until the mixture becomes light and fluffy.
Add in the eggs one at a time and carry on mixing it.
Once the mixture is blended in together, add in the flour in additions.
keep mixing it.
Finally, add a few drops of vanilla essence in to the mixture. Mix it a little more and then using an ice-cream scoop, divide in to cupcake cases. Just fill it two thirds of the way because it needs room to rise.
Let it bake in the oven until risen and golden. It took me about 20 minutes. 

Let it cool and then frost away :-)

Ingredients for the frosting:
2 large serving spoons of margarine.
4-5 large serving spoons of icing sugar (sifted)
You can add 1 tablespoon of any flavourings (like strawberry) or sifted cocoa (to taste).

Method:
Using a hand held mixer, thoroughly mix the icing sugar and margarine together until it is pale in colour.
Then add any flavourings.

The great thing about this cake recipe is that it is SO simple and takes such little time to make..and almost everyone loves the final result!

Enjoy :-)

Thursday, 23 February 2012

French toast!

Eat breakfast like a king, lunch like a prince and dinner like a pauper.

If you really do want to eat breakfast like a king, then this French toast is for you.
Its soft, sweet, deliciously crispy on the edges and moist in the center and is the true definition of the word ‘yumminess’.

My mum used to make it for us ages ago when we were kids and then once we moved to the UK it was forgotten about.
Until a couple of months ago when she made it for breakfast.
That's when I fell back in love with it!!!

The good thing is, just once slice of this can fill you up nicely because of the egg and milk that goes in to it.
We usually go for the freshly baked loaves of bread that you get in the bakery section of the grocery store. It is completely surrounded by a golden, crispy crust and is perfect for making French toast with. 
The method is so simple and so worth it!
You can use as much oil as you wish. If you are cautious about your health then use a tiny bit. The best thing to do is put a drop of oil on to your non stick pan and once its heated, you could brush it around the entire pan so that its greased up.
If you’re indulgent however, or would like a once in a while treat, then put use a generous amount of oil. Definitely don’t let your bread swim in it, but just enough to last in the pan until the bread is cooked.


Crispy on the outside and soft, sweet and
melt-in-your-mouth on the inside!!

Here’s the recipe:

Ingredients
1 loaf of bread- cut in to 6 chunky slices. (This would depend on the loaf that you use)
3 eggs
Whole milk- about a pint
1 tsp vanilla essence
Oil (If you are not worried about the amount, you can use about 6 tablespoons per two slices of bread)
Sugar (9 tablespoons or to taste)- you should be pretty generous here- for best results :-P

Method:
In a wide dish, whisk the eggs properly and then add the rest of the ingredients. 

Mix them all thoroughly and then dip your slices of bread in to the mixture for about 20 seconds each side (keep submerging the bread in to the mixture and make sure to do the same to the other side)
Meanwhile, in a wide non stick pan, heat the oil and then once it is quite hot, put in the slices of bread. Depending on how wide the pan is, I usually do two slices at the same time. Let it cook for about 2 and a half minutes. When you open the lid of your pan, the bread would have expanded a bit and sort of dried up. Flip them around and cover again. Leave it for another couple of minutes.

Cover the pan and reduce the heat slightly. This is especially important if you are not using much oil.
You can enjoy it straight away, or if you are cooking it in advance, then place it in an oven dish and cover with foil. 

Once it is almost completely done, using a pair of tongs, you can turn the edges of the bread on to the pan so that they crisp up nicely.
Once it is time to reheat, place it in the oven on a medium heat leaving the foil on.

(p.s the darkened bit is not burnt..its caramelised sugar...)

Oh so worth the calories...

-S

Thursday, 16 February 2012

Better than shortbread...Naan Khatai :-)

If you've ever been to Mombasa- The coastal city in East Africa where I am from, you would most definitely have heard about Hussaini Bakery. It is the most popular bakery that makes all types of biscuits, cookies and stuff. The most popular item that they make is the HB naan khataai.
Its like a hundred times better tasting than shortbread biscuits. I'm not even exaggerating!!!

I can remember these cookies existing ever since I was old enough to understand what cookies are. Which is pretty young!
They are large, golden coloured, circlular shaped, buttery, crispy, crumbly, buttery pieces of yumminess. (Yes I mentioned buttery twice!!!)
These are without a doubt the most famous biscuits available in Mombasa, and what you find in almost every household. My grandparents courier us entire boxes when we lived in Nairobi. Not by flight, but by a long 8 hour bus ride. They always survived the journey- but didn't last very long once they reached home!
Whenever people travel back home to Mombasa, they are sure to wrap dozens of packs in their suitcases and bring them back here. Its funny, but whenever anyone is going back there, they almost always bring some of these HB naan khatai back here- if not for themselves then for people who have asked them to bring some for them.
They are precious goods- and if you ever are lucky enough to taste them, then consider yourself highly priviledged!! :-)

My Dad is the absolute king of these. They have been his absolute favourite since forever and he was pretty pleased with the results of my home baked ones.
He told me to make more. That means it was good right?? :-D

Recently, Fauzia (who I have mentioned here many times) came up with a recipe for these cookies. I was so excited that I baked them as soon as I got a chance- which was yesterday.  I have to say, these are really really close to tasting like the Original HB bakery's Naan Khatai. Of course I don't think anyone can get it exactly like theirs but its a really close rendition.

The result? Golden, butter, yummy, crumbly cookies.
Definitely worth making and enjoying with a cuppa.
Fauzia, Thanks for the recipe. You are a genius and you have saved the lives of all the HB loving East Africans who live far far away from the amazing Bakery in Mombasa!


Here's the recipe:
250gm room temperature butter
three-quarter cup castor/grinded sugar 
1 egg, lightly beaten and at room temperature
1 and a half tsp baking powder
4 tbsp custard powder (plain/vanilla flavour)
few drops of yellow colour
2 cups all-purpose flour 
4 tbsp fine sooji/semolina
1 tsp vanilla essence
half tsp salt

First, mix the flour, custard powder, semolina, salt and baking powder together in a bowl and set it aside.

In a separate bowl, cream the butter and sugar, add the drops of colour. Beat in the egg and vanilla until fluffy. 

Now gradually add in the dry ingredients and mix until the dough comes together. Do not over-mix as that will ruin the crumbly consistency. Only mix enough for everything to get well-combined.

TIP: If you feel that the dough needs a bit more flour, add a tbsp at a time. Do not over-knead the mixture. Keep in mind that the dough will be chilled before shaping and baking, so it will stiffen up some more later, so don't add more flour than you absolutely need to. 

Transfer the dough into a piece of cling film and wrap it up tight. Refrigerate for about an hour.

Place some greaseproof paper on your baking sheets. Divide the dough into about 20-21 equal balls. Shape them into big circles of about 3" each, using the palms of your hand, like how we make burger patties. Place them on the tray and flatten/level them slightly and gently. Remember to leave enough room around them as they will expand slightly during baking. You can make imprints on them at this point, I used my heart shaped cookie cutters to make little heart shapes on my cookies.

Once all are shaped, place the trays again into the refrigerator for another half an hour to chill. 

In the meantime, pre-heat the oven at 160 C. These cookies are normally large, so we need a lower temperature in order to get them to crisp up properly without getting brown.

Bake for about 20-25 minutes. When they are half-way done, turn the trays around so that the cookies get evenly baked, and if at any time you feel they are starting to take too much colour, lower the heat some more.

Once they are ready, remove them onto a wire-rack to cool completely. When they come out of the oven they will be slightly soft, but don't worry as they will crisp up as they cool. 

TIP: After they've cooled COMPLETELY and if you feel they are still not quite crisp enough, just pop them back into the oven on low temperature of about 120-140 C and bake them for another 10 minutes until you are satisfied with the results.

Store them in an airtight container. 

Enjoy the baking AND the results!!!
-S

Saturday, 7 January 2012

Tarte tatin- An upside down orange tart :-)

I love it when the taste tester has people over.
Even when it's a late night meeting..
because:
a) I get the kitchen all to myself where I can spend ages experimenting different things
b) They're all guys so they don't really care about calories - therefore being excellent experimental subjects for me!!!
I mean, even if something goes a bit wrong and in my opinion, may 'not be worth the calories' - I know that they don't think that way..so Yay for me!!! :-)
I know it sounds mean but its not like I'm going to make them eat something thats...inedible :-P

Hey, if you bake and experiment - SOMEONE's gotta eat it!!!

I've been dying to make Tarte tatin. Ever since I watched it being made on Masterchef Australia, I've really been wanting to give it a go. Slight problem - I've mentioned before that the Taste Tester is not keen on cooked apples - which would be awesome to use in this upside down pie. (I still haven't understood this about him since my last post that had apples in it).
Anyway, for the past month or so I have been obsessed about oranges. Like seriously obsessed. I eat like four in a row. 
And I can eat more.

I don't really understand where this craze has come from since I used to hate oranges.
Its a pretty handy obsession to have though (if that makes sense)...because whenever I make dessert and people have it late at night - (which is obviously not a good idea) I'm pretty happy with my oranges.

No guilt.
How awesome is that??
I hope it lasts.

Anyway so back to my baking story. Since I'm in love with oranges at the moment, it only made sense to use oranges.
So I chopped them up and created a tart.
I didn't have a recipe so I just went with what I had seen them do on tv. 
I think it worked and I was pretty happy with the results :-)

I served it warm with vanilla ice cream and caramel sauce.
The caramel sauce was pretty awesome too. Thank you Hershey's people for that!!
Anyway next time I make it, I'm going to use apples and we'll see how that turns out.


Ingredients: (I don't usually measure stuff so I'm going to do my best to try and estimate)

2 oranges (you can use apples, peaches, pineapples, bananas- or any fruit you want)
3/4 cup sugar
1/2 vanilla bean or a bit less
Ready made (and ready rolled cos I'm lazy) puff pastry (roll it out to around 0.5cm and cut it slightly larger sized than the bottom of the pan that you are using)
Butter

Method:
Sprinkle the sugar and the vanilla on a heavy bottomed pan (which is suitable for the oven too) and place it on medium heat.
Let the sugar caramelise a bit..and become a nice goldeny brown (note: I burnt the first batch of caramel and it was literally a matter of seconds) and then remove it from the heat and arrange the sliced fruit on the syrup. Be very careful because you do NOT want this caramel syrup to get in contact with your skin while its hot. Also - Please don't try and taste it no matter how tempting it may be!!!
Place the rolled out pastry on top of the mixture and using a spoon tuck in the edges of the pastry around the caramel/fruit mixture so it encases it nicely.

Using a fork or a knife, pierce the pastry a few times and bake it on Gas mark 7 for about 20 minutes until the pastry is cooked and you can see the caramel bubbling at the edges.

Remove it from the oven and let it stand for about a minute and then VERY carefully (protect your hands with an oven mitt or a tea towel from the bubbling hot caramel) place a plate larger than the pan you cooked in on top of the pan and flip it over.
Brush butter on it generously.
Let it cool slightly and then serve with ice cream or whipped cream and enjoy :-)

Keep smiling :-)
-S

Tuesday, 13 December 2011

A Traditional East African breakfast- Barazi & Mahamri

Greetings all!!!
I know I haven't been posting for a while..Almost a month actually. Apart from the other things that have been keeping me busy, I also have exams to sit.
Not good :-(
I haven't sat for exams for years..and the nerves just seem to be getting to me! Honestly. For my first paper, after reading through the questions, my mind had gone completely blank for the first couple of minutes. Sitting right under the nose of the invigilator didn't help either. Oh well, thankfully I remembered most of the stuff (i hope) that I had studied and managed to jot it down. Prayers that I do well please??


Its good to finally have a new post up. Apologies everyone, for being silent for so long...hopefully will be posting slightly more often.
When I do get the time to however, I usually get so carried away with my stories that when I'm done, my posts usually end up having to be edited and at least half of what's written needs to be removed. Other wise y'all would be bored to death.

Anyway, todays blog post is going to be something different.
A traditional East African breakfast. Its quite popular in the coastal town of Mombasa where I was born. We call it Barazi and Mahamri. (the tanzanians usually call it mandazi- but mahamri sounds better :-P)

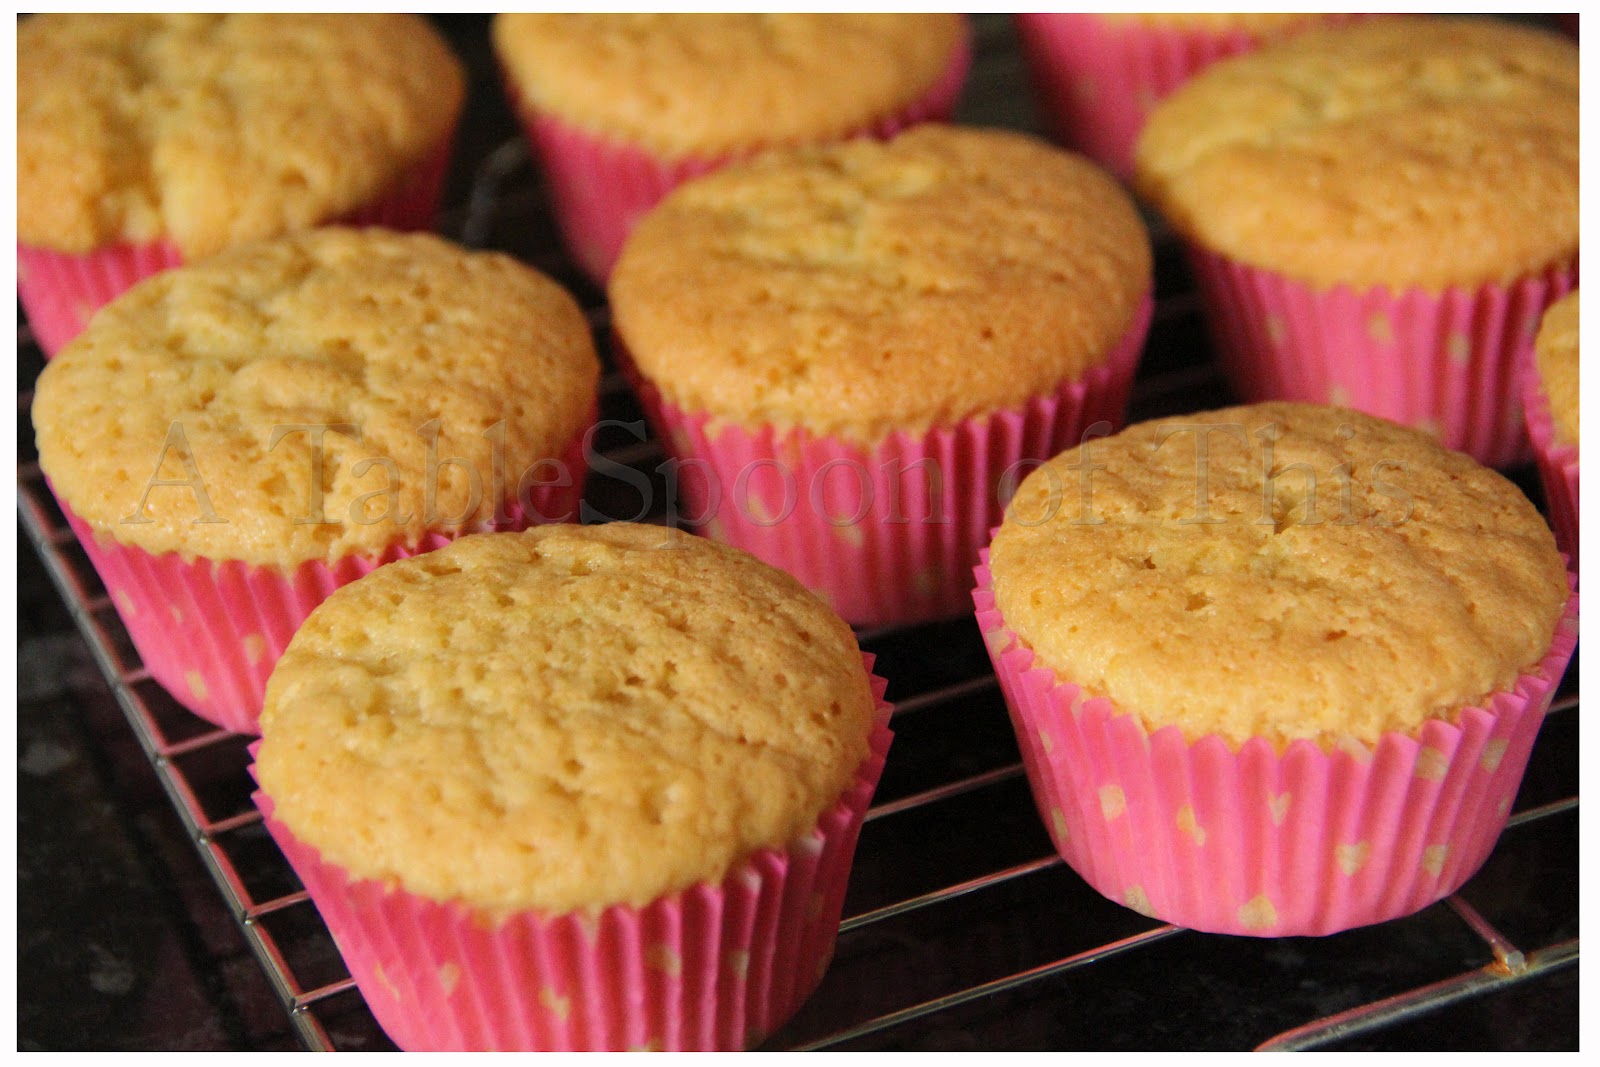
Barazi is pigeon peas (gungo peas) cooked in coconut milk and is eaten with Mahamri- a slightly sweet fried bread flavoured with cardamom.
It is officially one of the most amazing combinations ever.
The salty savouriness of the barazi is complemented perfectly with the sweet mahamri which is light and fluffy and which is SO SO amazing, even if you just have it with a hot cup of tea.

I have to admit, mahamri was actually one of my biggest enemies in the kitchen.
The dough is majorly difficult to bring together. Its like wrestling.
No..its MORE difficult!!!!
Actually, I think its just me who finds it difficult to make the dough. People usually find it easy.
I only recently learned how to make it right. (thankyou mummy :-) )

One of the most amazing and favourite childhood memories I have is a little tradition we had with my grandparents when we used to go stay with them in Mombasa as a family.
On Sunday mornings we were awoken at the most unearthly hour (not so unearthly- but for a little kid, 6am is pretty early okay?) and dressed in our swimming costumes.
Within five minutes of being woken up, a feverish excitement would fill our home. The three of us kids would be jumping around in excitement, harassing everyone to hurry up and get in to the car. Big baskets with flasks, crockery, breakfast, water and of course, spare clothes would be loaded in to the car and we would set off to the beach.
The drive there was amazing. If you've ever been to Mombasa, you would know that as soon as you step out of the plane, a sweet aroma of coconut palm trees and flowers mingled with the smell of seaweed surounds you.
Heavenly!!!
Once we would reach the beach, it would be nearing daylight and we would run down to the sea. With the tide usually really low, we would splash around in the warm sea water, try and touch the tiny fish that would be darting around in the water and watch the tiny crabs scampering around in the sand and scurrying into their little holes.
We would sit on the damp sand and create masterpieces with our buckets and spades, gaze at the tall, beautiful camels that would be brought on the beach and if we were really lucky, have a long ride on the glass bottomed boats that would give us an opportunity to see the beautiful sea life in its own natural surroundings.

After thoroughly exhausting ourselves and with our little hands filled with all the colourful shells that we would find everywhere, we would run up to the little concrete, open air 'huts' where we would sit and enjoy our breakfast.
With a plate loaded up with coconuty barazi and sweet mahamri, we would happily eat, washing it down with sweet, steaming hot, indian tea.

Those memories were the best. Those were some of the most ideal moments that I could ever have as a child!!
I pray and wish that I get that opportunity again. Not only to be enjoying the raw beauty of my homeland, but also spending time with my loved ones. Laughing, chatting, eating together and having an amazing time.

When I do make this breakfast, sometimes I just shut my eyes and imagine all the amazing childhood memories that are attached with it. I can never thank God enough for granting me those wonderful moments and blessing me with the memories of them so that I can always be grateful for them!!


This is what it looks like inside :-)

Couldn't resist :-)


Here's the recipe..

For the Mahamri:

Ingredients:

1 cup plain flour
1 cup self raising flour
10-12 tsps sugar
cardamom powder (elaichi)
1 pack yeast
4 tbsps oil

Bring together all the ingredients with hot water, using your hands. Be very very very careful and don't put in too much water otherwise you'll be left with just a mess. I kept making that mistake!! keep adding a little water constantly until the dough is brought together. Keep kneading it until it reaches a soft, smooth and stretchy consistency.

Place the ball of dough into an air tight container (large enough to let it rise) and let it sit for about 2 and a half hours, by when it should have risen.
Once it is ready, we usually split the dough in to six balls. Lightly dust the surface where you are going to prepare it and then roll out each of the six balls in to circles. Roll each ball out to about half an inch thickness and then cut it into four using a knife.

You get 24 out of this recipe.

Prepare the oil for deep frying and make sure the oil is quite hot. Fry the mahamris- about 2 at a time so you can keep making sure they get browned equally. Turn them over and watch them rise- its too cool!!! :-)

(Just a side note- if you want to prepare the dough in advance, you can make it and freeze it immediately in a plastic bag. Don't let it rise!!!- whenever you do want to make it, remove it from the freezer and let it defrost itself for a couple of hours and then give it an hour or two to rise before you can roll it out!!)

For the Barazi:
Ingredients: (for about two people)

3/4 cup gungo beans (If they are raw, soak them in hot water overnight and then cook them in the pressure cooker for about 15 minutes)
If you're lazy- like I am most of the time, you can buy the canned gungo beans and use them instead :-) - just make sure you wash them out!! I use one can for two peoples breakfast!!

Half a block of creamed coconut or canned coconut milk. (In Africa we used to use the real coconut milk- but I am completely clueless on how to do that!!)
2 green chillies
1/2 tsp turmeric powder
salt to taste

All you have to do is place your cooked beans in a pan and add some water until its slightly above the surface of the beans.
Add in the creamed coconut and the green chillies, turmeric and salt

Let it boil for a while (about 15 minutes), until everything is combined. If you are using canned peas, let it boil in the coconut slightly longer so the beans soften a bit more!!

Serve hot and enjoy!!! If you do want to reheat the mahamri later on, you get best results by heating them in the oven on a low temperature!!

Enjoy :-)

-S